For web pages today, images are a real challenge.
On one hand, images account for over 60% of the page weight. This means they play a major role in overall page load time, motivating dev teams to try and make images as small (byte-wise) as possible. On the other hand, new devices boast retina displays and higher resolutions, and designers are eager to leverage these screens and provide beautiful rich graphics. This trend, along with others, led to a 30% growth in the average number of image KB on a page in the last year alone.
This conflict is partly due to what I think of as “Situational Performance”. If you’re on a fiber connection – like most designers – the high quality images won’t slow you down much, and will give you a richer experience. If you’re on a cellular connection, you’ll likely prefer a lower quality image to a painfully slow page.
Fortunately, not all hope is lost.
A few months ago we created a new optimization called Low Quality Image Placeholders, or LQIP (pronounced el-kip) for short. This optimization proved useful in bridging the gap between fast and slow connections, and between designers and IT, so I figured it’s worth sharing.
Core Concept
LQIP’s logic is simple. In a sense, this is like loading progressive JPEGs, except it’s page wide. There are more implementation details below, but it boils down to two main steps:
- Initially load the page with low quality images
- Once the page loaded (e.g. in the onload event), replace them with the full quality images
LQIP gives us the best of both worlds. On a slow connection, the user will load a fully usable page much faster, giving them a significantly better user experience. On a fast connection, the extra download of the low quality images – or the delay of the high quality ones – does not lead to a substantial delay. In fact, even on the fast connection the user will get a usable page faster, and they’ll get the full rich visuals a moment later.
Real World Example
Here’s an example of the Etsy homepage loaded with and without LQIP. Note that Etsy isn’t actually applying this optimization – I made a static copy of their homepage and applied the optimization to it using Akamai FEO.
On a DSL connection speed, LQIP boosted the page visual by about 500ms (~20%), while on FIOS it was only 100ms faster (10%). This acceleration came from the fact the overall page weight dropped from ~480KB to ~400KB thanks to the lower quality images. All in all, not bad numbers for a single optimization – especially on a highly optimized web page like Etsy’s home page.
DSL Connection, Without LQIP (above) vs. With LQIP (below)
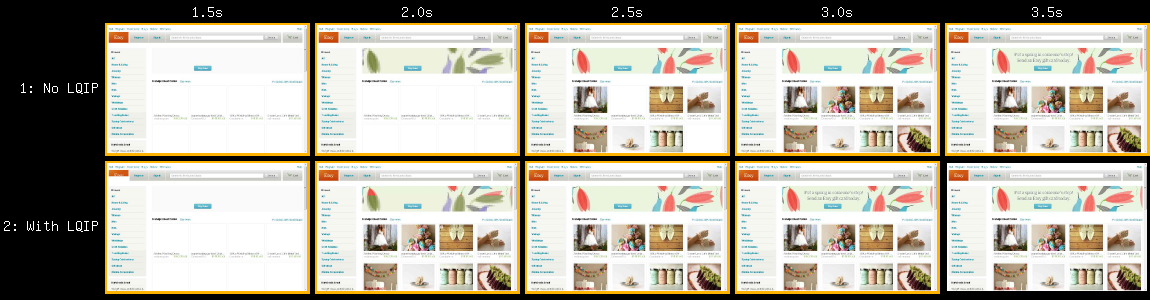
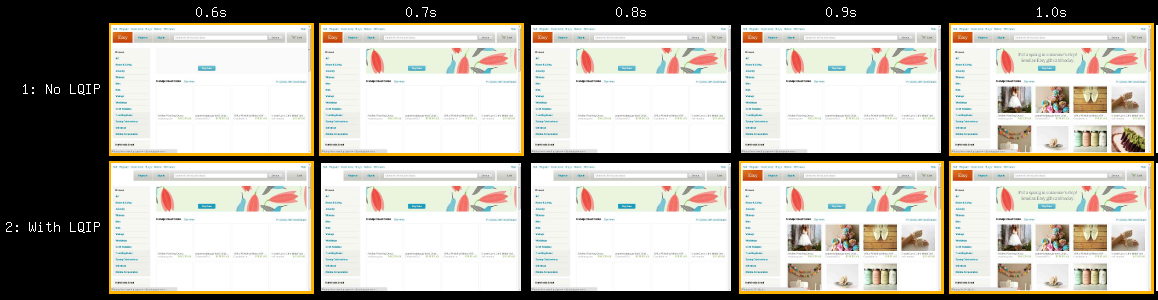
FIOS Connection, Without LQIP (above) vs. With LQIP (below)
The faster visual isn’t the whole story, though. The LQIP page you see actually uses lower quality images than the other. While the LQIP page weighs 80KB less before onload, it weighs 40KB more by the time the full quality images were downloaded. However, the page is definitely usable with the low quality images, keeping the user from idly waiting for the bigger download. You can see an example of a regular and low quality image in the table below – I didn’t turn quality down too far.
| Image Before LQIP (15.6 KB) | Image After LQIP (5.2 KB) |
|---|---|
 |
 |
It’s just intelligent delivery
LQIP also helps on the political front, by bridging the gap between IT/Dev and the designers.
The designers are happy because their full-quality images are showed to the user, unmodified. Sure, the images are a bit delayed, but the end result will usually show up within a few seconds, and their handiwork would remain unharmed.
IT is happy because they deliver a fast page to their users, even on slow connections. The low quality images may just be placeholders, but (assuming quality wasn’t too drastically reduced) the page is fully usable long before the full images arrive.
Implementation Tips
LQIP implementation includes three parts:
- Prepare the low quality images (server-side)
- Load the low quality images (client-side)
- Load the high quality images (client-side)
Step #1 varies greatly by your system. You can create the images in your CMS systems, duplicate them in your build system, or adjust quality in real-time using tools like Akamai Edge Image Manipulation.
Step #2 is simple – just load the images. You can do so with simple img tags, CSS, or using your favorite scripted image loader. If you use small enough images, you can even inline images (matches Ilya’s recommendations). In Akamai, we use LQIP in combination with loading images on-demand, reducing the number of requests as well.
Step #3 is where a new script probably comes in. A simple flow would be:
- Create a JS function that iterates the IMG tags on the page, and for each: 1. Determines the full quality image URL (using a naming convention or an extra attribute on the IMG tag)
- Modifies the SRC attribute to point to this full URL (will reload the image)
- Call your JS function in the onload event
If you want to get fancy, you can load the high quality image in a hidden IMG tag, and then swap the low quality image with it at the onload event. This will prevent the low quality image from disappearing before the full quality image is fully downloaded, which can hinder the user experience.
Lastly, if you use CSS to load your images, you can also swap the low quality images for higher quality images by loading/applying a new CSS.
Summary
I’m pretty excited about LQIP.
It helps bridge the gap between two conflicting and growing needs, would work on old and new browsers alike, and is (relatively) easy to implement. It’s a “perceived performance” optimization, which is how we should all be thinking – and I believe it’s an optimization everybody should apply.